Small roof leaks often start where metal meets masonry or siding: the flashing. When flashing fails, water finds paths into attics, walls, and ceilings. This blog explains why Roof Flashing Failures happen, how to spot them early, and what to do next—from quick DIY patches to professional repairs—so your home stays dry, efficient, and safe through every season and storm.
What causes roof flashing failures and how do you fix them?
Roof Flashing Failures usually stem from improper installation, age-related corrosion, movement of building materials, or sealant breakdown. Fixes range from cleaning and resealing seams to replacing step or counter flashing and re-mortaring chimney joints. Minor issues respond to targeted sealant and fasteners; persistent leaks require professional flashing replacement to restore a continuous, watertight path that sheds water correctly.
Importance of Roof Flashing in Preventing Leaks
Flashing is the water-management hardware that seals joints around chimneys, walls, vents, and skylights so runoff is directed onto the shingle surface—not into your home. Well-detailed chimney flashing, step flashing, and counter flashing work together to stop capillary action and wind-driven rain. Pair routine checks with early leak detection to keep small problems from escalating.
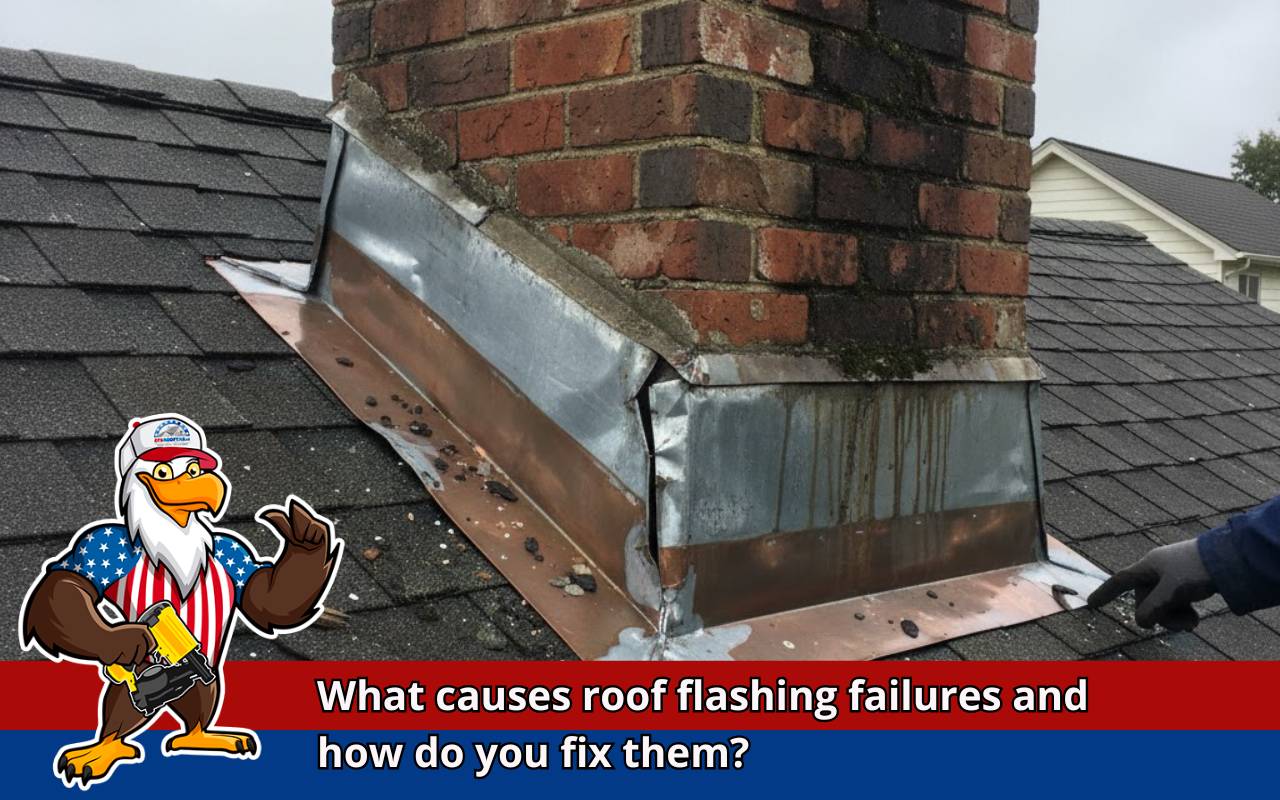
Common Causes of Roof Flashing Failures
- Poor step flashing lapping or nails driven through exposed flashing legs.
- Cracked mortar joints that loosen counter flashing around chimneys.
- Electrolytic corrosion or dissimilar metals accelerating rust at overlaps.
- Thermal movement that opens seams and breaks sealant bonds.
- Debris buildup that traps moisture along flashing edges.
Addressing these triggers early helps prevent recurring Roof Flashing Failures and costly interior damage.
Specific Issues with Step Flashing
Step flashing must be installed in a shingle-by-shingle sequence, with each L-shaped piece properly sized and lapped. Pieces that are too short, misaligned, or fastened incorrectly create capillary pathways behind siding or wall coverings. After wind events, inspect for lifted shingles or visible gaps; resetting pieces and correcting nail placement can halt developing Roof Flashing Failures.
Identifying Problems with Counter Flashing
Counter flashing should be reglet-cut and embedded in mortar or securely tucked under cladding to cover base flashing. Look for crumbling mortar, loose seams, and rust streaks on masonry. In coastal climates, choose corrosion-resistant alloys and renew mortar beds to maintain compression and seal. Neglect here often translates directly into interior stains and ongoing Roof Flashing Failures.
Signs of Roof Flashing Failures
- Tea-colored ceiling spots after storms and musty attic odors.
- Rusting or peeled-back metal along walls, chimneys, and penetrations.
- Granules piling in gutters near wall intersections—often a stress zone.
- Masonry hairline cracks beneath counter flashing drips.
- Darkened rafters or damp insulation visible during attic checks.
Compare what you see with these signs of roof failure to prioritize repairs before drywall damage multiplies.
Quick Fixes for Roof Flashing Issues
For small gaps, clean to bare metal, prime if required, and apply high-grade butyl or polyurethane flashing sealant over seams and nail heads. Carefully re-seat lifted legs and secure with corrosion-resistant fasteners. For hairline cracks, flashing tape rated for exterior UV exposure can bridge joints. When leaks persist, schedule roof leak repair to stop recurring Roof Flashing Failures.
Professional Solutions for Severe Roof Flashing Failures
Roofers may remove surrounding shingles, replace base and counter flashing with properly lapped metal, and re-mortar chimney reglets. They can add ice-and-water membrane beneath critical transitions and correct incompatible-metal contact. This resets the water-shedding hierarchy and eliminates chronic Roof Flashing Failures while extending roof service life.
How to diagnose and fix minor flashing leaks
- Document symptoms after rain, then perform safe, dry-day inspection; start with early leak detection at walls and chimneys.
- Clean debris; wire-brush rust and remove failed mastics to expose sound metal.
- Re-seat displaced step flashing, add correct fasteners, and seal heads.
- Bridge hairline seams with exterior-rated flashing tape; tool sealant beads.
- Recheck after the next storm; if staining returns, book a pro via the contact page.
Frequently Asked Questions
How often should I inspect flashing?
Twice a year—spring and fall—and after severe wind events. Regular inspections reduce the chance of surprise Roof Flashing Failures.
Is roof cement a good long-term fix?
No. It can crack and trap moisture. Use proper metal lapping, compatible sealants, and replacement pieces to avoid future Roof Flashing Failures.
Which metals resist corrosion best?
Aluminum and galvanized steel are common; copper and stainless offer superior durability when matched to local conditions and avoid dissimilar-metal Roof Flashing Failures.
Can siding repairs solve chimney leaks?
Usually not. Chimney leaks are typically flashing- or mortar-related. Address the reglet cut, counter flashing, and sealant to resolve Roof Flashing Failures.
When should I call a professional?
Any time leaks persist after DIY sealing, mortar is failing, or step flashing was misinstalled. Professional remediation prevents repeated Roof Flashing Failures.
References
Consumer Reports – Best Roofing Buying Guide
Family Handyman – Chimney Flashing Installation: How to Leakproof Your Roof